
Do you remember those days when you were a kid and you pretended to be a mighty Viking? I mean, who didn’t have a Viking helmet and a sword?
To me, that helmet was like a Holy Grail. Actually, it still is and I know that you feel the same way. Yes, we are all grown up now and we’re so busy, I get that, but don’t you think it’s time to have some fun?
If you like costume parties and you want to look cool, trust me, you can never be mistaken with Viking helmet with horns. You will definitely get all the attention at that party.
Moreover, if your kid wants a new helmet for his birthday party, the Viking horned helmet will make him fearless and strong, and he will love it.
So, either way, you need a cool helmet that you can easily make on your own without spending a lot of money. That’s why I made this simple step-by-step guide on How to make a Viking helmet. Now, let’s have some fun.
Quick Navigation
How To Make A Viking Helmet – The Material Needed
So, before you start, make sure that you have everything in front of you, so you don’t have to waste your time. You’ll need the following:
- Scissors
- Silver duct tape or silver paint-measuring
- Measuring tape-normal
- Normal tape or glue-paint
- Paint
How To Make A Viking Helmet (Using Cardboard):
If you’re not an expert and you want to make that helmet quickly and without making a chaos all over the room, this video would be perfect for you. It’s really easy and everyone can do it.
STEP 1: Measure the size of your head and make sure that you do it right. You don’t want that helmet to be too tight.
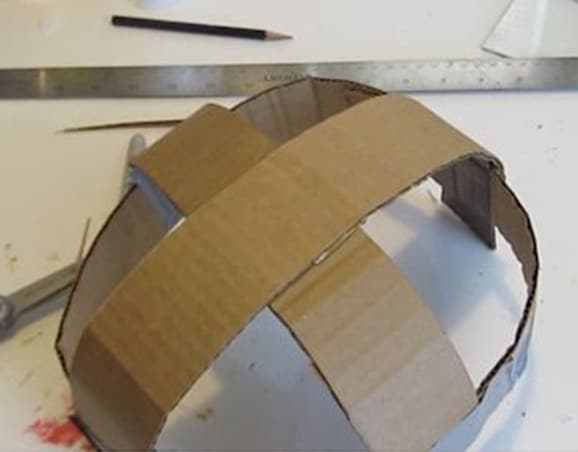
STEP 2: Then out of the cardboard, cut a strip (it should be 2 inches wide). After you made a nice circle, tape the ends together (you can use a tape or glue). Then you’ll need two more pieces, which you should attach to that headband (see picture below). Now that cardboard starts to look like a helmet.
STEP 3: Now we need that silver duct tape to wrap the whole helmet or if you prefer, you can use a silver paint instead of duct tape.
STEP 4: So, we’re almost done. Now that you have a helmet, we obviously need some horns. So, after you drew a pair of nice horns on the cardboard, cut them out.
STEP 5: Then we need a glue to place that horns to the sides, just make sure that you cut away the duct tape in order for those horns to stick better to the cardboard.
STEP 6: No Viking helmet is real unless you attach some rivets to it, right? So, to do that, you need glue and little circles that you cut out of paper (choose the color you want) or foam. Then with that glue stick the circles to the helmet.
STEP 7: After you did all that job, it’s time to bring that helmet to life with colorful horns. You can paint them as you wish, it’s not like you need to follow some rules. I love brown color while in the picture below you can see white horns. So, it’s up to you.
STEP 8: Voila! You made your very own Viking helmet and it’s time to show it to your friends.
How To Make A Viking Helmet (Using Hat)
You’ll need the following:
- A hat
- A cutting knife-kitchen
- Kitchen towels-tape
- Tape-white
- White acrylic paint as a primer coating-acrylic
- Acrylic paint (the choice of color is up to you)
So, here is one more way that shows you how to make a Viking helmet. This one includes a hat, so make sure you get one.
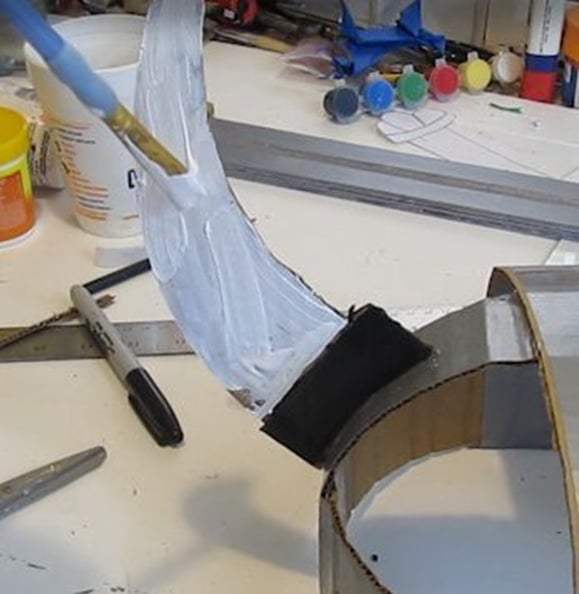
STEP 1: Since you already have a hat, now we need to make horns. And to do that, we’ll need masking tape and kitchen towels. Grab a three-or-four-layer kitchen paper, roll them up and use enough tape to cover them and tighten them. Since you probably want to have the right length of horns, use the cutting knife to make the horns perfect.
STEP 2: Now that you have horns, it’s time to place them where they belong. So, use a glue gun and stick the horns to the hat.
STEP 3: For this step, you’ll need decoupage glue and pieces of kitchen paper. Apply one coat of glue and then after you put pieces on, apply one more coat. Cover the hat completely. In the middle part of the hat, where you want to place rivets, you should add more layers of kitchen paper. Then let it dry for 24 hours.
STEP 4: For prime coating, use white acrylic paint. After it’s completely dry, use other acrylic paint (the silver looks pretty cool) and paint the helmet the way you want.
STEP 5: If you want to add rivets, there are various ways to do that, so choose the one that you want, for example, you can cut them out of cardboard, stick them with a glue, and paint them with white acrylic.
STEP 6: And that’s it! You finally have your very own Viking helmet.
Conclusion
So guys, that would be all. I hope that you enjoyed this step-by-step guide on how to make a Viking helmet. Now it’s time to make that super cool helmet for your kid or yourself. Also, if you want more ideas on making a helmet, you can find some videos or tips on how to make a Darth Vader helmet or Viking motorcycle helmet.
Feel free to share the article so other people can have some fun too. If you have some suggestions, please leave us a comment.
