

Step By Step Guide to Painting Your Motorcycle Helmet
We hear all the time from beginner motorcycle riders that they won’t wear a helmet because they are ugly (don’t even get me started as to why that is about the dumbest reason I’ve ever heard for not wearing a motorcycle helmet). The reasoning goes that traditional motorcycle helmet makers are so focused on features and safety that they ignore making their helmets look awesome.
The result is that riders end up not wearing helmets (where they aren’t legally required) or they buy helmets that look great but are shitty quality. Both bad things.
I’m not going into the benefits of getting a wearing a great motorcycle helmet in this post, instead I’ll focus on how to make the best of the situation assuming you have purchased an “ugly” helmet you want to make awesome. Clearly if you read the title of this post we’re focusing on how to paint your motorcycle helmet.
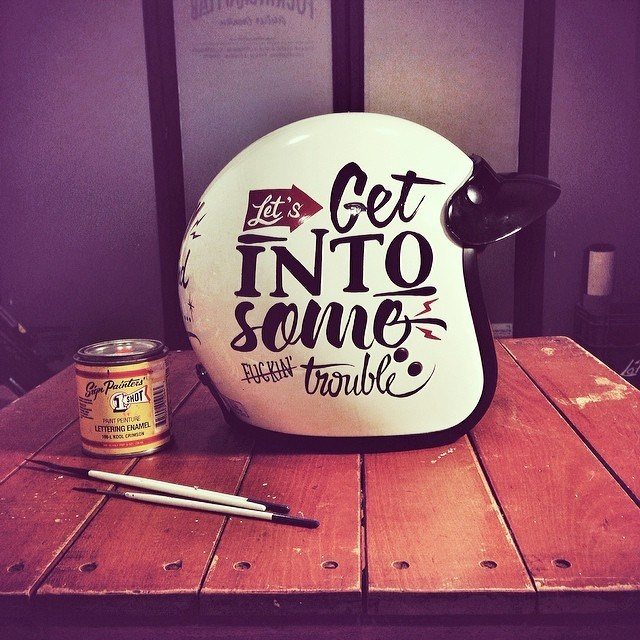 Source: https://www.instagram.com/p/kiEsbnqBKE/
Option 1: The easiest type of motorcycle helmet painting
Preparation
- Painter’s tape Airbrush gun or paint spray
- Paint with your favourite colour (water paint)
- Old big newspaper
- A raincoat to avoid paint splash over your clothes
- A sticking-plaster
- Flexible stencils (optional)
- Markers and paintbrushes
Step 1: Using the sticking-plaster to cover anywhere you do not want to paint, as well as put on the raincoat. Then opening old big newspaper out and on the ground and put your motorcycle helmet on it.
Step 2: Using painter’s tape airbrush or paint spray. After that, you have to wait until the paint is dry, about 20 minutes.
Step 3: When the paint is dry, using markers draw your picture’s skeleton which is from your ideas.
Step 4: Using paintbrushes and water paint to paint your motorcycle helmet based on your skeleton. This is the most difficult step which requires your drawing skill and your caution, because if you make any mistake, your ideas will be blurred. In this step, you have to wait for more, at least,2 or 3 hours until the paint is dry.
Step 5: After waiting, you must spray transparent paint (no colour) in order to make your motorcycle helmet’ surface smooth and shiny. You also have to wait for 20 minutes.
Step 6: Removing the sticking-plaster, so everything is done, you can wear it immediately.
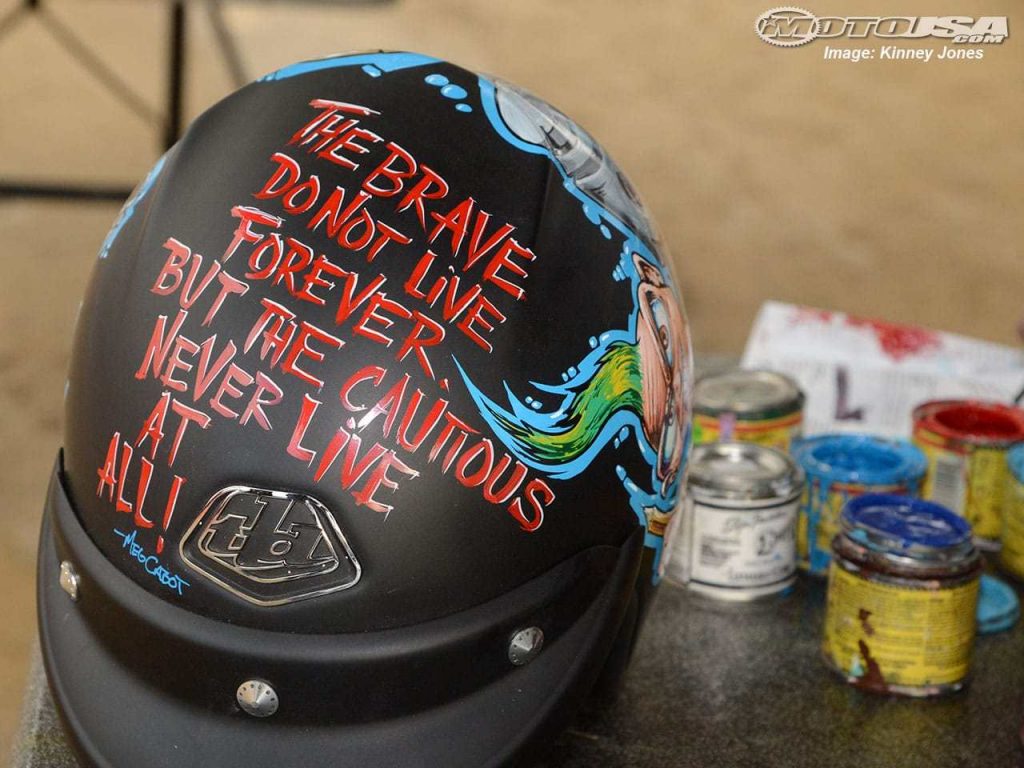
Type 2 – The more advanced helmet painting option
Preparation
- Acrylic paint
- A pencil, a marker
- A paintbrush
Step1– creating colour foundation step: painting the motorcycle helmet’s surface, but remember that, in this type, you do not paint all the surface like the type 1, you can use the paintbrush to paint only areas where you want to draw. You can use any colour that you like.
Step 2: Using the pencil to draw the skeletons of your ideas on what you have just painted, however, if it is not completely dry, it will be bad, therefore, you need to be waited until you can make sure that it is dry totally.
Step 3: Colouring the skeletons with many layers to cover the paint that is in step 1, but you should colour the new layer when the old layer is dry.
Step4: Using the marker to redraw the skeletons in order to make them clear.
To sum up, they are two type of painting on motorcycle helmets we want to introduce for you to help them more beautiful and it can completely become an excellent gift for yourselves, your family’s members, your lover, your friends and others.
In addition, if you do not have much time, there are a lot of painting services that you can find on the internet or you can buy motorcycle stickers and decals in the many stores to add to your motorcycle helmet. Although using painting services will more professional, especially printing 3D on motorcycle helmets, they cannot make us as happy as painting by ourselves.
We will have more valuable and exciting experience, and certainly, we will treasure them more. Moreover, you need to be careful when you painting, because paint can stick to your hand or other areas of the motorcycle helmet’s surface and make destroy your art. We hope you will succeed and good luck!
How to Paint a Motorcycle Helmet – Videos
UPDATED: Since we created this post we found some cool videos online that show you exactly how to paint your motorcycle helmet. We decided to add to this post by sharing some of our favorite helmet painting guides. Here you go:
How to paint your helmet : Step by step process of painting a motorcycle
How To Swirl Paint A Motorcycle Helmet
You can paint your old helmet to look totally customized for about $30 using a can of Krylon Fusion white splay paint, 2 jars of Testor’s enamel paints, and a clear coat from a paint shop.
https://www.youtube.com/watch?v=LtL9uErm73o
Plasti Dip Helmet – CHEAP HI-VIZ Motorcycle Helmet Option
How to Paint your own RED BULL Helmet in 14 Steps
Helmet Painting – How to Paint a Helmet?
Do you want a cool helmet? If you are like me then you want to help your brother to have a cool helmet. Maybe you just want to spend some time with your friends and see how creative you can get? Or, maybe, you have other reasons for helmet painting? Well, whatever reason you have, I am here to help you to bring your creativeness to the maximum. Let’s have some fun.
Have you ever thought about what is important when painting your helmet? Or what should you pay attention to? I believe that if you are new to this, it is confusing to know what is the right time for doing all those steps and more important, in which order.
The reason that I wrote about this topic is actually pretty simple. Everyone wants a cool helmet, but not everyone knows how to paint one. Well, the good news is that after reading this article you will know how to do it. And perhaps that will be your new hobby. By the time you finish reading this article, you will be familiar with everything you should know about successful helmet painting.
I will show you how to paint your helmet and it is up to you to choose which steps you will follow. It is important to know that the same process can be applied to other types of helmets such as: how to paint a football helmet, how to paint a motorcycle helmet and others.
What Will You Need?
For both types of helmet painting you will need the following items:
- Sandpaper or sanding block (sanding block is easier to control)
- Paints (spray or can)
- Clear coat (it is applied at the end of the process and it protects the color and enables it to stay beautiful for a long time)
- Some kind of stand to put your helmet on while painting (or whatever other option you have for making your helmet stable)
Optional:
- Of course, the mask and gloves are optional but we would highly recommend you using them for safety purposes
- Primer (it is better to use it because of the long lasting effect)
- Guide coat (very useful coat if you are asking me)
- Spray guns (it is easier and faster to use unless you like to waste your time on other, less effective ways)
| Product name | Rating | Price |
|---|
Hamlet Painting: Step by Step
STEP 1: Sanding
My motto is: the strong foundation is the key to success. That is exactly what we want with this very first step.
Firstly, you want to make sure that you sand through the whole helmet and especially be careful to sand all venting, edges, and corners so the color later can fit perfectly.
Secondly, removing or making flat the stickers is important. Just make sure everything is smooth enough before moving on to the next step.
YT_code
STEP 2: Priming And Drying
Apply two or three coats of primer and let it stay overnight (if possible). You should wear a mask when painting.
STEP 3: Optional: Guide Coat
First, you have to apply guide coat and then sand it down. The guide coat helps you identify highs and lows, because of using the darker color over the light primer and vice versa.
After identifying highs and lows you should keep sanding it until it is flat. After that, you should wash it up with water and soap. When you are spraying, keep in mind that you should do that lightly and evenly, do not rush the process. You could apply two or three coats, it is up to you. But for better results, we would recommend you to apply three coats.
STEP 4: Optional: Base Coat
Apply two or three coats evenly. If you do not want to follow this step just skip to the next one.
STEP 5: Paint On Your Color
Now we are getting closer to our goal. Pick your favorite color and apply it evenly. Navy, black or red colors will look amazing and cool on your helmet. Three coats would be the best in order for the color to be good-looking. Make sure to let it dry completely before the next step. You came this far so you do not want to be lazy and not to wait for that color to dry properly.
STEP 6: Clear Coat
This step is very important. It helps in protecting all that work that you have just done, so do not underestimate it. You can pick up the matte or the shiny one, but I prefer the former it somehow seems cooler. Apply two coats and let it dry.
STEP 7:
Finally! You made it. Now it is time to enjoy the view. Feel free to congratulate yourself for this amazing helmet painting. You can show it to your friends and family as well. Believe me, they will be amazed at what you just did. There is no reason to be shy about that. Good job!
Finally, feel free to check out some of the tips we have in store for embarking on this sort of endeavor.
Tips:
- How to paint the vents perfectly? If you want to do that correctly, you should tap from the inside.
- Do I have to sand helmet even if I want to spray paint matte? Yes, even if you want to spray paint matte you should sand it down because sanding helps the paint stick. You do not want to something goes wrong because of skipping that part.
- Using base coat is a good option when painting, because it helps in long lasting color effect.
Important – Safety First, At All Times!
It goes to show without saying, but it is of utmost importance that you make sure that all safety regulations are in place. This is not exactly a life-threatening endeavor, but there are a few not so good things that can happen.
You can cut yourself and paint evaporations aren’t exactly healthy and can make you dizzy. Therefore, equip yourself with a mask and a pair of work gloves. With those two puppies, you’re ready to go and make that helmet shine!
Helmet Painting – Conclusion
Now there you have it. The step by step guide that is very clear and understandable so everyone can follow it, whether you are painting the helmet for the first time or you are familiar with the process and you would like to add something new to that.
Make sure to closely follow the basic structure of this guide, but feel free to add your own creativity to the mix as well. After all, this is painting, which is art. And the very essence of art is expressing your feelings and what you feel on the inside.
We hope that you enjoyed this tutorial. If you like this article, feel free to share it with your friends. Also, feel free to leave us a comment.
